

Starting a tuition class doesn't require a rented office, a sign board, or a business plan. Most tutors in India begin with two or three students — a neighbour's child, a cousin's friend, someone referred by a parent who trusts you — and grow from there, one batch at a time.
That's the easy part. The harder part isn't the teaching itself; it's everything around it. Deciding what to teach and to whom. Setting a fee that feels fair without underselling yourself. Finding your first few students without a marketing budget. And once you have students, keeping track of who's coming, who's paid, and who you promised a make-up class to last month.
This guide walks through that whole sequence — from deciding what to teach, to building the simple systems that keep a growing tuition class from turning into chaos.
Decide What You Will Teach
Before anything else, get specific about what you're actually offering. "I teach tuition" is not a starting point — "I teach Class 9–10 Mathematics and Science, CBSE board" is.
A few things worth deciding upfront:
Subject. Teach what you can explain clearly, not just what you scored well in. There's a real difference between understanding a subject yourself and being able to break it down for a confused 13-year-old.
Class or grade level. Younger students (primary level) need patience and simpler explanations more than deep subject expertise. Senior secondary students (Class 11–12) need genuine command of the syllabus, especially if they're preparing for board exams or entrance tests.
Board or curriculum. CBSE, ICSE, and state boards don't just differ in textbooks — they differ in pacing, question style, and what "understanding" the topic actually means for that exam. If you're teaching multiple boards, know the differences rather than assuming they're interchangeable.
Age group and teaching style. A 9-year-old and a 17-year-old need fundamentally different approaches, energy levels, and communication styles. Don't assume the same lesson plan works across a wide age range.
One-to-one or batches. This affects almost everything downstream — your pricing, your schedule, your space needs, and how you teach. It's worth deciding early rather than drifting into whichever comes first.
The safest starting point is usually the subject and class level you already know best — not necessarily what seems most in-demand. A tutor who's confident and clear in one subject builds a better reputation, faster, than one spread across five subjects they're only somewhat sure of.
Choose Your Tuition Model
There isn't one "right" way to run tuition classes — the common models each fit different circumstances:
Home tuition (students come to you). You control the environment, don't lose time travelling, and can teach multiple students back-to-back. Requires a space at home that's reasonably quiet and presentable.
Teaching at students' homes. Convenient for parents who prefer their child to learn in familiar surroundings, and often commands a slight premium because of the travel involved. The trade-off is your own time and transport cost between students.
Small batch classes. Grouping students by class and subject lets you teach more students per hour and often works out cheaper per student for parents. It needs more planning — a fixed schedule, consistent pacing, and a space that fits a small group.
Online tuition. Removes location as a constraint entirely — you can teach students in other cities or states. It needs a stable internet connection, a device, and comfort teaching without being physically present to read the room as easily.
Hybrid models. Many tutors mix formats — batches for a core subject, one-to-one for exam-focused revision, or a home-tuition base with occasional online sessions when travel isn't possible. There's no rule against combining approaches as your situation changes.
None of these is universally better. A retired teacher with a spare room might find home batches ideal; a working professional tutoring in the evenings might prefer online sessions that don't require travel at all.
Decide Where You Will Teach
If you're teaching in person, the space itself matters more than most new tutors expect.
Teaching from home is the most common starting point — no rent, no commute, and you already know the space. The main considerations are practical: a room with minimal outside noise, decent lighting, comfortable seating for however many students you're teaching at once, and enough privacy that other household activity doesn't interrupt the class.
A dedicated rented space makes sense once your student count and batch schedule genuinely need it — usually well past the point of a handful of students. It adds a fixed monthly cost, so it's worth committing to only once you have a fairly reliable, ongoing student base.
A shared or local space — a community hall, a room rented by the hour, or space shared with another tutor — can bridge the gap between "teaching from home" and "renting your own place," letting you test batch sizes without a long-term commitment.
Online removes physical space from the equation, but introduces its own basics: a reliable internet connection, a quiet background for video calls, and familiarity with whichever platform (Google Meet, Zoom, or similar) you plan to use consistently.
Whatever you choose, a few things matter regardless of format: good lighting, minimal background noise, comfortable seating if students are physically present, and a setup that feels safe and appropriate — particularly important when you're teaching other people's children in your home or theirs.
Decide How Much to Charge
There's no fixed, correct number here, and be wary of anyone claiming there is — tuition fees in India vary enormously by city, subject, class level, and format, and even tutors in the same neighbourhood can charge noticeably different rates for similar subjects.
That said, a few factors consistently influence what's reasonable to charge:
- Subject — Maths and Science, and exam-focused subjects generally, tend to command higher rates than general subject support.
- Class level — senior classes (11–12) and competitive-exam coaching (JEE, NEET, and similar) are usually priced higher than primary or middle-school tuition.
- City and locality — metro and tier-1 city rates tend to run higher than tier-2 and tier-3 towns, though this isn't a strict rule.
- Batch size — one-to-one tuition commands a premium over group batches, since you're dividing your time across fewer students.
- Teaching frequency — daily classes are typically priced differently (usually a lower per-class rate, but higher total) than two or three sessions a week.
- Your own experience and track record — an established tutor with a track record of results can generally charge more than someone just starting out.
- Facilities — a dedicated, well-equipped teaching space can support slightly higher pricing than an ad-hoc setup.
- Online vs. offline — online tuition often prices a little lower than home tuition, partly because it removes travel time from the equation.
Rather than picking a number in isolation, a practical approach is to find out what tutors teaching similar subjects and class levels are charging nearby — parents will usually tell you if you ask directly, and it gives you a realistic starting range rather than a guess. It's also reasonable to start slightly lower while you're building a track record, and revise your rates once you have consistent demand and results to point to.
Get Your First Students
Most tuition classes don't start with marketing — they start with people who already trust you.
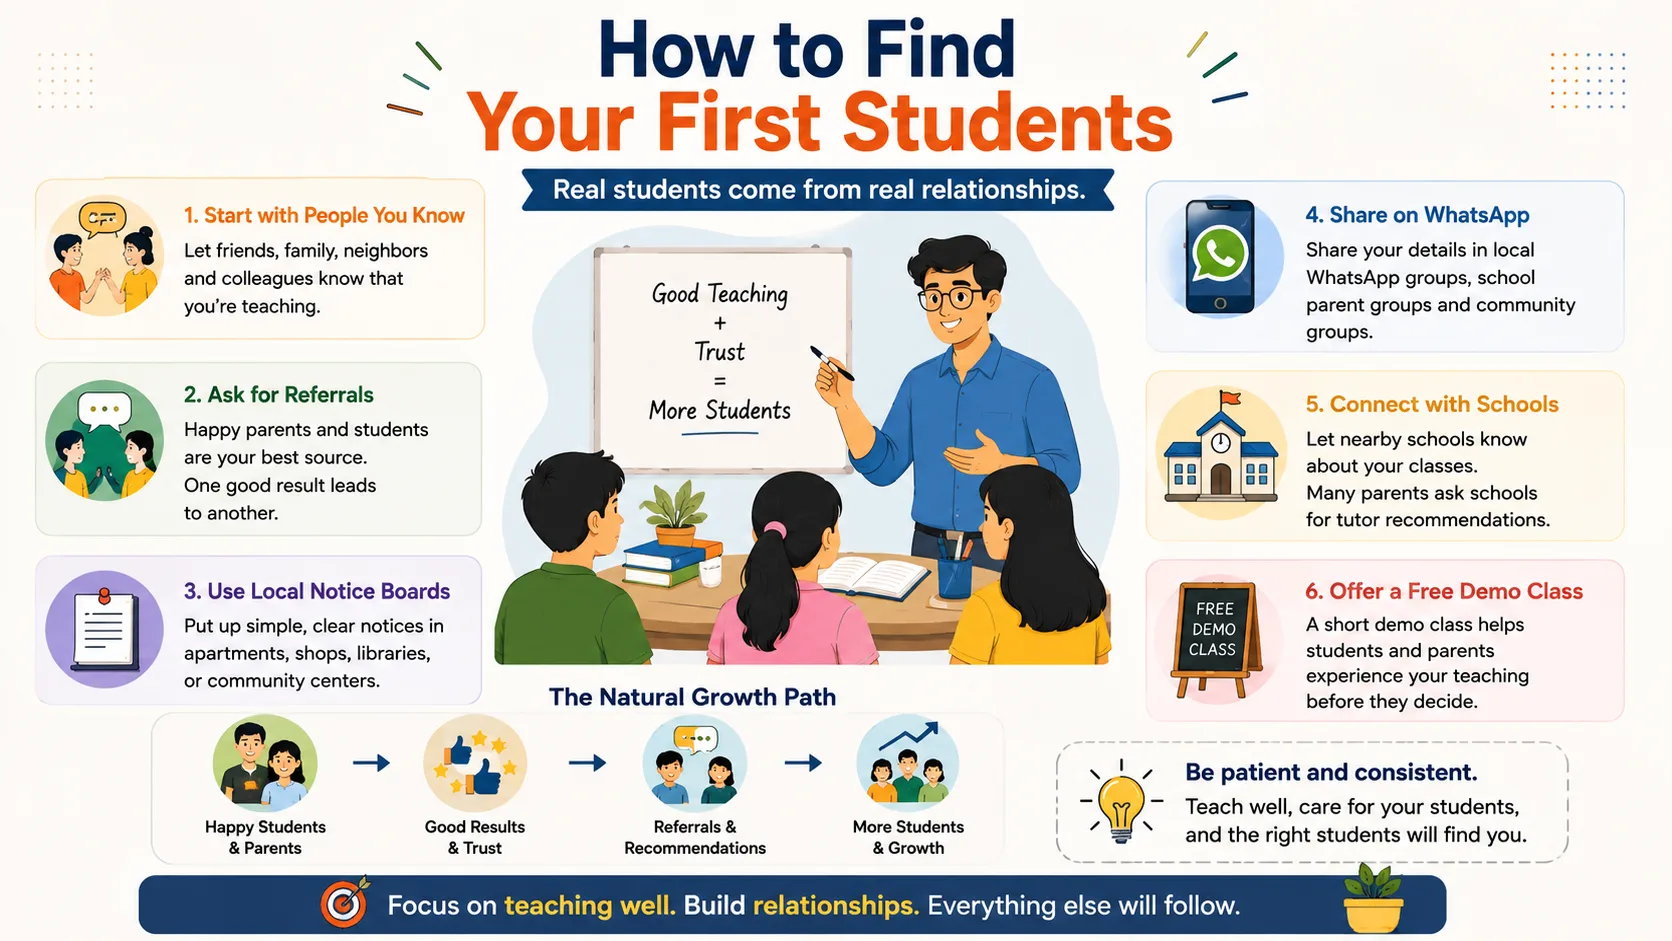
Referrals from parents and students are usually the strongest starting channel. If you've taught even one or two students informally — a relative's child, a neighbour — a good experience there tends to travel by word of mouth faster than anything you post online.
Local word of mouth. Being known in your neighbourhood as "someone who teaches Class 10 Maths well" carries real weight. This builds slowly, but it's durable — parents trust other parents' recommendations far more than an advertisement.
Neighbourhood visibility. A simple, honest flyer at a local shop, a mention in a residential society's parent group, or being introduced at a school-gate conversation can bring in your first few enquiries without any real cost.
WhatsApp. Many parents coordinate school-related decisions through WhatsApp groups (society groups, school parent groups). A respectful, non-spammy mention when relevant — not a mass forward — is often more effective than any paid promotion at this stage.
Social media. A simple Instagram or Facebook presence — even just a profile with your subjects, timings, and a way to contact you — helps parents who are actively searching feel reassured they can find out more about you before reaching out.
A basic local online presence. Being findable when someone searches "[your subject] tuition near [your area]" helps, even if it's just a simple listing or a one-page website rather than anything elaborate.
Introductory or demo classes. Offering a single trial class (free or heavily discounted) lets a hesitant parent and student experience your teaching before committing to a full month. It's one of the more effective ways to convert an enquiry into an enrolled student, as long as you treat the demo with the same seriousness as a paid class.
Avoid anything that feels like spam — mass messaging strangers, exaggerated claims about results, or aggressive pricing discounts to undercut other tutors nearby. Tuition is a trust-based relationship, built one student and one satisfied parent at a time; that's slower than a paid ad, but it tends to last.
Set Up a Simple Class Routine
Once you have your first few students, the thing that keeps a tuition class from feeling chaotic — for you and for parents — is a routine, even a simple one.

A fixed schedule. Set consistent days and times per batch or student, and stick to them as closely as possible. Parents plan around your schedule; changing it frequently erodes trust quickly.
Batch size. Decide how many students you're comfortable teaching together, and hold that line even when you're tempted to squeeze one more in. A batch that's too large stops feeling like personal attention, which is usually the entire reason parents chose tuition over a larger coaching centre.
Lesson planning. Even a rough plan — what you'll cover this week, this month — keeps you from improvising every session and helps you notice if you're falling behind syllabus pace.
Attendance. Knowing who attended and when matters more than it seems early on — both for your own record and for answering a parent's question later without guessing.
Homework and assignments. A simple, consistent habit of assigning and checking work reinforces what you've taught and gives parents visible evidence their child is progressing.
Parent communication. Decide early how and how often you'll update parents — a quick monthly note, a WhatsApp message after a test, or just being reachable when they ask. Parents who feel informed are far less likely to have "is this actually working?" doubts.
Holidays and missed classes. Decide your policy on this before it comes up, not in the middle of an awkward conversation — whether missed classes get made up, how you handle your own leave, and how that affects fees.
None of this needs to be formal or written down when you're teaching two or three students. But the habits you build now are the ones you'll rely on later when you're managing several batches at once.
Keep Track of Students and Fees
Even with a handful of students, you'll quickly find yourself needing to remember (or look up) a set of recurring details:
- Student list — names, and which batch or subject each student is in.
- Contact information — a way to reach the parent, not just the student.
- Attendance — who came, who didn't, and any pattern worth noticing.
- Fees due — how much each student owes, and by when.
- Payments received — what's actually been paid, and when.
- Receipts — some proof of payment, even something simple.
- Student history — a rough sense of how each student is progressing over time.
For a small number of students, this is manageable with almost any method:
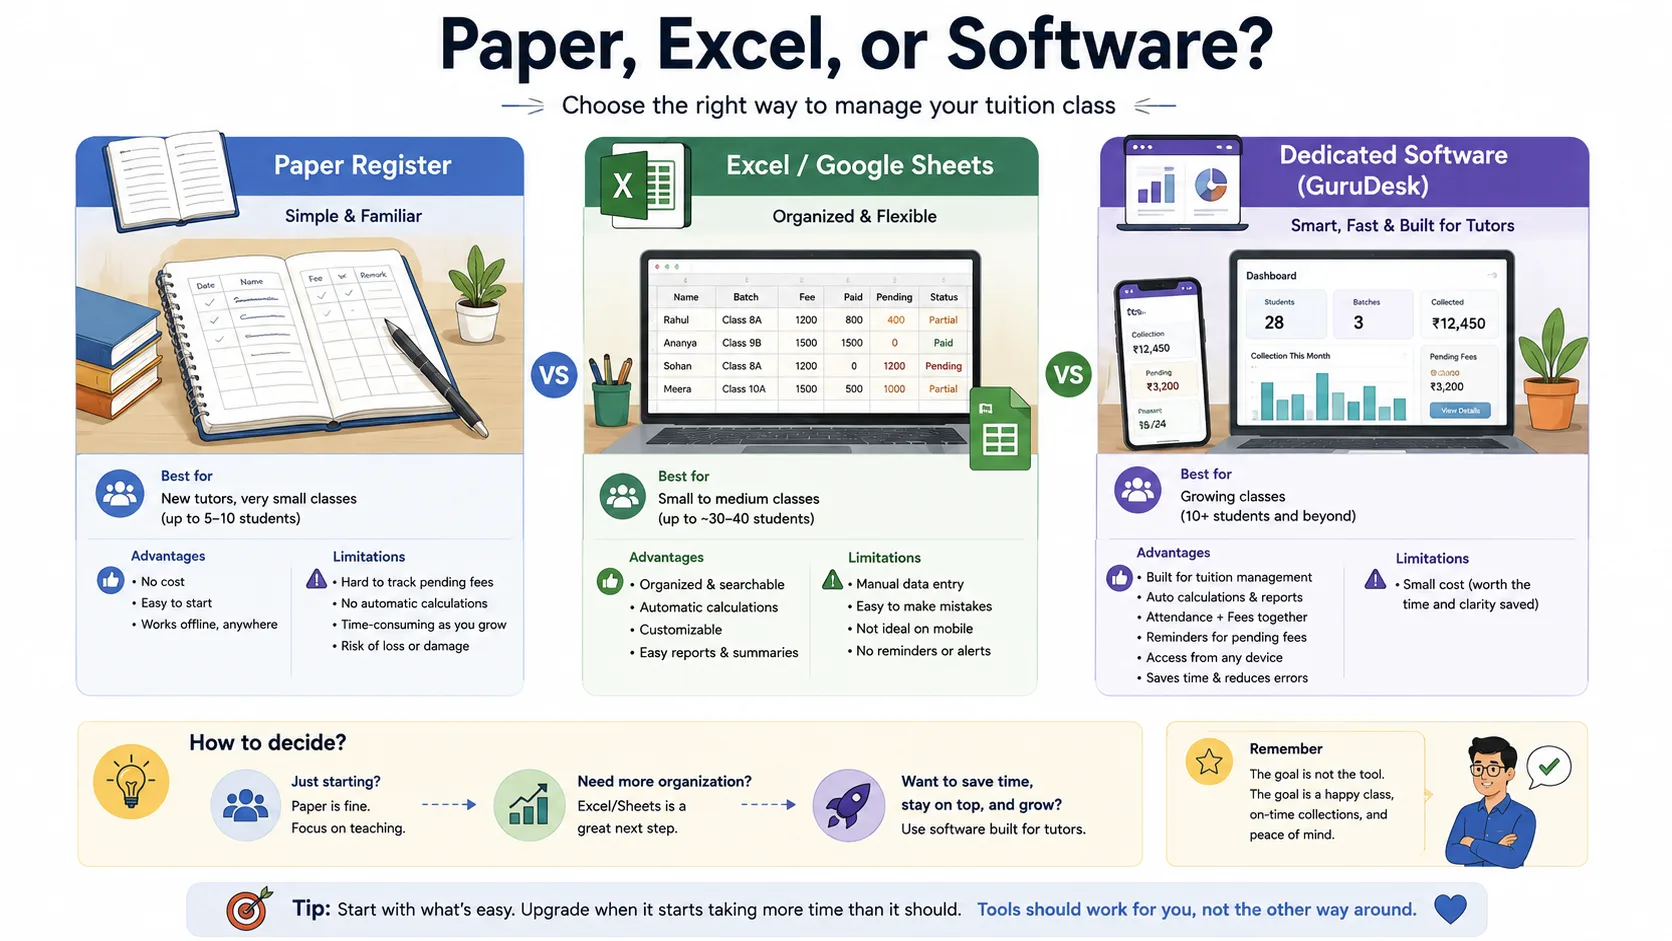
A notebook or register works fine at a small scale — no setup, no learning curve, and it's what many tutors start with. The trade-off is that finding a specific past record means flipping pages, and totals have to be calculated by hand.
Excel or Google Sheets gives you more structure — searchable, and capable of automatic totals if you build the formulas. It takes a bit more upfront effort to set up, and the effort of maintaining it tends to grow as your student count and batch count increase.
Dedicated tuition-management software is built specifically around these recurring tasks — student records, attendance, and fee tracking each have a proper place, rather than being reconstructed from a general-purpose tool. This usually only becomes worth the small learning curve once record-keeping itself starts taking real time.
There's no need to jump to software on day one. If you're weighing a physical receipt book against tracking things digitally, this comparison walks through when each one genuinely fits. And if you'd rather start with something free and printable, there's a ready-to-use attendance register template you can adapt from day one.
Set Up a Simple System Before You Grow
The habits that feel unnecessary with three students become genuinely useful once you're teaching fifteen or twenty across two or three batches. It's much easier to build good habits early than to retrofit them onto a messy set of records later.
A few things worth being consistent about from early on:
Consistent naming and records. Use the same format for student names, batches, and dates every time — "Class 9A" and "9th Std A" referring to the same batch in different places is a small thing that causes real confusion later.
Batch schedules. Keep a single, current source of truth for who's in which batch and when it meets — not one version in your head and another on paper that's slightly out of date.
Attendance and fee tracking, kept together. It's common for attendance and fee records to live in separate places — a register for one, a notebook or app for the other. Keeping them close (or at least cross-checkable) avoids the situation where you can't quickly answer "was this student even attending during the month they didn't pay?"
Communication records. A rough note of what you told a parent — a fee waiver you agreed to, a make-up class you promised — saves you from relying purely on memory months later.
Backups. Whatever you're using — paper or digital — think about what happens if it's lost, damaged, or your phone breaks. A photo of your paper register, or a synced digital copy, is a small habit that prevents a genuinely bad day if something goes wrong.
None of this requires new tools. It's mostly about discipline with whatever you're already using — but that discipline is what determines whether your system holds up as you grow, or quietly falls apart.
When Should You Move Beyond Paper or Spreadsheets?
There's no fixed student count that marks the "right" moment to switch — it depends on when your current system starts costing you more time or accuracy than it saves. A few signs tend to show up around that point:
- You're managing more than one batch, and cross-checking schedules or totals across them takes real time.
- Your student count has grown enough that you're spending a noticeable chunk of your evening just updating records.
- You've been genuinely unsure whether a student paid this month, more than once.
- You've had to search through old attendance records to answer a parent's question, and it took longer than it should have.
- You're generating receipts manually, and it's starting to feel repetitive or error-prone.
- You've had schedule conflicts — double-booked slots, or forgotten which batch meets when.
- You're spending more time on administration than feels reasonable relative to your actual teaching time.
If none of these apply, there's genuinely no urgency to change anything. A notebook or a well-maintained spreadsheet, used consistently, is a completely reasonable way to run a tuition class — plenty of experienced tutors never move past it, and that's a legitimate choice, not a compromise.
Where GuruDesk Fits
If the signs above are starting to sound familiar, this is where a tool like GuruDesk fits in — not as a requirement for starting a tuition class, but as an option once the administrative side genuinely needs more structure than paper or a spreadsheet comfortably provides.
GuruDesk is built specifically for tuition teachers and small coaching centres, rather than as general business software adapted for the purpose. It handles the core administrative workflows this guide has walked through: student management, batch management, attendance tracking, fee and payment records, and automatic receipt generation when a payment is recorded. It also tracks payment history and partial payments separately, so you can see not just what each student currently owes, but what they've paid over time without reconstructing that information by hand each time you need it.
It's worth being clear about what this means in practice: GuruDesk doesn't replace the fundamentals covered in this guide — deciding what to teach, setting a fair fee, finding your first students, and building a reliable routine. Those come first, and they matter more than any tool. What it can help with is the part that tends to get harder as you grow — keeping student records, attendance, and fees organised without it eating into your teaching time.
If you're just starting out with two or three students, a notebook or a simple spreadsheet is almost certainly all you need for now. If you found yourself nodding along to the signs in the previous section, comparing your current setup against dedicated software — GuruDesk included — is a reasonable next step, on your own timeline, whenever that point actually arrives.
A Simple Way to Start This Week
If you're ready to begin, you don't need to wait for a perfect setup. Here's a practical sequence:
Day 1: Decide the subject, class level and teaching format (one-to-one, batch, online, or hybrid).
Day 2: Set up the teaching space — even if it's just a quiet corner with a table — and gather basic materials (notebook, pen, whiteboard if relevant).
Day 3: Decide on a simple schedule and fee structure based on what tutors nearby are charging.
Day 4: Tell people in your existing network — family, neighbours, friends, local WhatsApp groups — that you're accepting students.
Day 5: Prepare your first lesson and a simple way to track attendance and fees (a notebook, a spreadsheet, or the attendance register template mentioned earlier in this guide).
First week: Start with the students you already have a relationship with, rather than waiting for a bigger setup or more students. The system will improve as you go.
Most successful tutors didn't start with the perfect setup — they started by teaching people they knew, and built from there.
Final Checklist
A quick summary of what this guide has covered, in order:
- [ ] Decide your subject and class/grade level
- [ ] Choose your teaching model (home, at students' homes, batches, online, or hybrid)
- [ ] Choose your teaching location and set it up properly
- [ ] Decide your fee structure, based on realistic local rates
- [ ] Find your first few students through referrals and word of mouth
- [ ] Set a fixed, realistic schedule
- [ ] Set up basic attendance tracking
- [ ] Set up basic fee tracking and receipts
- [ ] Establish a habit of parent communication
- [ ] Build a simple, consistent system for records before you need to scale it
Frequently Asked Questions
How much money do I need to start tuition classes? Very little, in most cases. If you're teaching from home with students you already have a relationship with, your main costs are basic stationery, and possibly a whiteboard or study materials. Costs rise mainly if you rent a dedicated space or invest heavily in marketing — neither of which is necessary to start.
Can I start tuition classes from home? Yes. Many tutors start by teaching a small number of students from home. You'll want a reasonably quiet room with decent lighting and seating. Whether any registration, licence, or other local requirement applies depends on how and where you operate. If you're moving beyond a small home-based setup, check the requirements that apply in your city or state before committing to a premises.
How many students should I have in one tuition batch? A smaller batch is generally easier to manage when individual attention matters, but the right size depends on the subject, age group, teaching style, and space available. A batch that feels too large to give personal attention is usually the more useful signal than any fixed number.
How do I get my first tuition students? Referrals and word of mouth are typically the strongest starting point, especially if you've already taught even one or two students informally. Local visibility — neighbourhood groups, WhatsApp, a simple social media presence — helps from there, along with offering a demo class to convert interested parents.
How much should I charge for private tuition? This varies significantly by city, subject, class level, and format, so there's no single correct number. A practical approach is to find out what similar tutors nearby are charging for the same subject and class level, and price yourself within that range rather than guessing in isolation.
Do I need a separate room to start tuition classes? Not necessarily. Many tutors start in a shared family space, provided it's reasonably quiet and free of interruptions during class time. A dedicated room becomes more useful as your batch sizes and schedule grow.
Should I use a notebook or Excel to manage tuition students? Either works well for a small number of students. A notebook needs no setup at all; Excel or Google Sheets adds searchability and automatic totals if you're comfortable building the formulas. Choose whichever you'll actually keep updated consistently — that matters more than which format you pick.
When should I start using tuition-management software? Usually once manual tracking itself starts costing you meaningful time — multiple batches, a growing student count, difficulty confirming who's paid, or generating receipts manually. If your current system isn't causing you real friction, there's no need to switch yet.